Giffing With WeVideo

Creating gifs seems to be almost a right of passage on social media at this point. Whether it is creating something to make people laugh, to teach a new idea, or to make a point, creating a gif is just an institutional part of our culture. Education has embraced gif use, but very few have started creating for themselves. At least for me for a long time there were two barriers. First, gif making, particularly with my face on it was limited to tools with learning curve that took a lot of time, so therefore prohibitive to my teaching life. Second, if there was an online tool to create gifs, it was maybe a little sketchier than I would have liked, it maybe didn’t respect creators’ rights, or I couldn’t readily add my face to the gif.
With that said, WeVideo rolled out a gif creation tool in their suite this month that helps educators or students create gifs in a responsible way. Also it is not time consuming to learn and still exports to Google Drive. Join me for this quick walk though. At the end of this post, I have some ideas for possibly using it over the next school year.

Finding the gif format on WeVideo.
Step One -
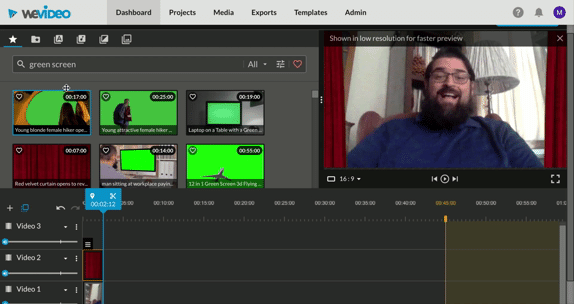
WeVideo makes it super easy to find the gif creation format. It should be on your front page between recording and podcast. If you click that button it sets up an automatic suite that has a 45 second time limit. As you will probably already be aware, gifs are usually short blasts of information and visuals. So if you are going over 45 seconds, switch to a quick video.

In the gif creation tool, you are automatically given three video tracks. This makes it easy to use a clip, green screen, and a text layer.
Step Two -
When you get into the gif creation format, you are automatically given three video layers, but no audio. Gifs traditionally do not have audio components, although that is changing online. Although you can add more layers to your gif, three is a great starting point. Remember that the bottom layer is the background of your gif; so if you want to have your face with text and green screen, you would put your clip on the bottom layer (or Video 1) then green screen on the middle layer (or Video 2) then your text on the top (or Video 3). You can then more text or other materials on additional layers.

The Gif tool gives educators a great opportunity to create content with their faces on it. Make sure to consider that when making a gif.
Step Three -
If you would like to have your face on the gif, you can use the record tool on WeVideo or you can upload a clip from your phone. In the gif above, I recorded just a two-ish second clip of me grinning and waving. Then once I save it, WeVideo automatically adds it to the bottom line of my timeline. That allows me to use that as my background in the video and quickly move directly to creating using green screen.

Remember that your clip goes on the bottom and green screen above. Then you can color key (which WeVideo makes so easy).
Step Four -
Using the clip library, you can search green screen and find a clip that works for your gif. I chose the curtains as this gif is meant to be a welcoming gif for my Google Classroom next year. After selecting your clip and dragging it to the middle timeline, remember to trim it to meet the time of your background clip. After that double click on your green screen clip and find the color key option. Then use the dropper to color key out the green screen. You are in business.
Once you have your green screen and your clip layers in place, you can add text or flair to the image. Remember that users can add more video layers or other gifs if they would like more to their gif.
Step Five -
Adding text to your gif allows you to quickly communicate ideas with your audience. To start, click the text tab at the top (it looks like a box with an ‘A’ in it). Choose a text that looks good to you and then drag it onto the top timeline. Remember, just like your green screen clip, to trim it to match your original clip or else you might have text with just a blank background.
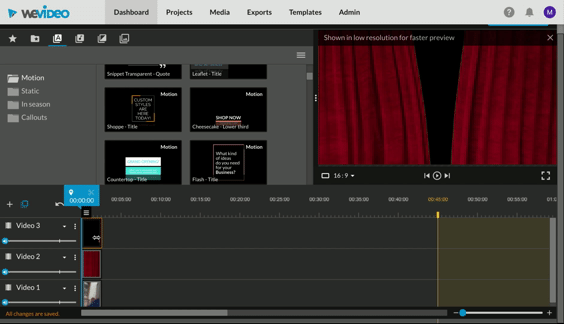
Remember to change your text! I also like to change the colors to match my school’s colors.
Step Six -
Once you have your text template trimmed and in place, you need to add your message. Double click on the text clip and then you can start editing the text. I added a simple “Welcome Back” message for my students. You can add whatever message you want (ideas below), and don’t forget that you can add multiple text layers by adding another video layer to your clip.
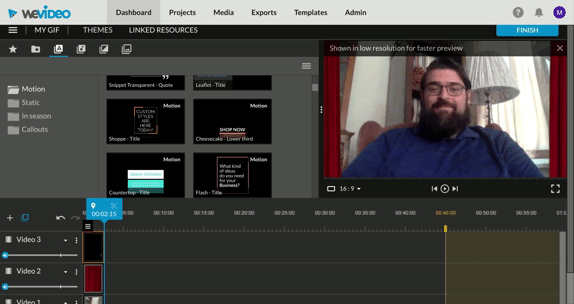
Remember to finish your gif. It is recommended for mobile and social media to use the Small size, but you can use which ever one you would like.
Final Step -
Once you have everything ready to go and beautiful, remember to click finish. This will then allow you to download your clip as a gif. As suggested to me by WeVideo, the Small size is great for social media and mobile, but you can go larger if you would like to embed them in a document or on a site. Just be aware that the larger you go the larger the file size and a lot of sites will not embed gifs over a certain size.
Below is the final product of 5-10 minutes of work. Check it out!

Here is the final product.
Now that you understand how to create gif using WeVideo, what can you use it for in your classroom? Well, here are some suggestions:
One of my favorite suggestions, per the WeVideo Ambassador’s group, is to create reaction gifs as a feedback tool for student work. As we work in an increasingly digital world, giving students feedback is so important. When I teach college level courses I try to record either video or audio of my feedback to my students’ writing. That is a great way to go as well for K-12 on quarterly projects, but on daily or weekly projects, a gif with your face and the feedback could be a great shorthand for students to understand how they did. Also these gifs could be reusable for multiple students.
On the flip side of feedback, having students create reaction gifs to your classroom experiences can allow you to make quick changes to your lessons and replan quickly the next day. If you give students 5-7 minutes at the end of class to create a gif showing their quick reaction to the lesson and then you can flip through them at the end of the day, you can gauge understanding and interest in the topic. Also you can share their reactions via a slide deck for the beginning of the next day of class. Also this would be great add for distance learning at the end of a video lecture or unit.
As an English teacher, I just love the idea of a text reaction. I get so excited at the idea of teaching Romeo and Juliet and getting to Mercutio’s death and pausing to have students make their own version of how his death scene would look. Or reading through A Monster Calls and giving students a minute to process the ending by having them create a personal gif reflection to the text. There are so many options that would reinforce the text’s complexity while allow students freedom in how they show their understand.
Putting on my STEM or STEAM hat, encouraging students to film the end of their experiments or them solving their problems could create amazing connections between students’ work and how they view that work. They could add text reactions alongside their visual reactions to their amazing work.
On the teacher end, creating a gif or 10-15 seconds that cycles through your contact information, pertinent sign ins, and important class information could save time and effort throughout the year. It could be easily sent to parents, new students, and community members without having to retype the information every time.
Finally, my favorite is to just give it as an option on choice projects. I have been consistently amazed at how creative students can be if they are just given a new tool to create with in their classroom.
One of the most important aspect of using this particular tool is that it can unlock creativity while also giving students a quick lesson in how copyright and fair use works, even informally. All clips on WeVideo are copyright free, so students and teachers can use them without worrying about copyright claims. This is vastly different from how many online gif creation tools operate and a savvy teacher would take a minute to explain how copyright works and what students can do to protect themselves. For 21st Century creators this is an imperative issue to understand and we can be the frontlines in helping our students be competent creators.
For more information, check out WeVideo or their amazing WeVideo Creator Community.
This post was not sponsored by WeVideo.